In our last blog, we saw how Sophia, a service manager uses the feature of Area of service to manage services provided to their customers. Using Area of service, she views all of the service providers that are available within required proximity from the location of customer. Based on proximity search, line-of-sight distance and travel distance, she comes to know which of the service provider is nearest to the customer. Based on this, she assigns a route to service provider to reach the customer. With the help of area of service, she can also visualize regions on map for which service providers are responsible.
In this blog, we will see how to add area of service section in record form so as to get the above mentioned results. In order to achieve this, follow the steps given below:
Area of Service tab
To add Area of Service tab, open Entity form and go to ‘Insert’ tab. Click on Web Resource button, as shown in the screenshot.


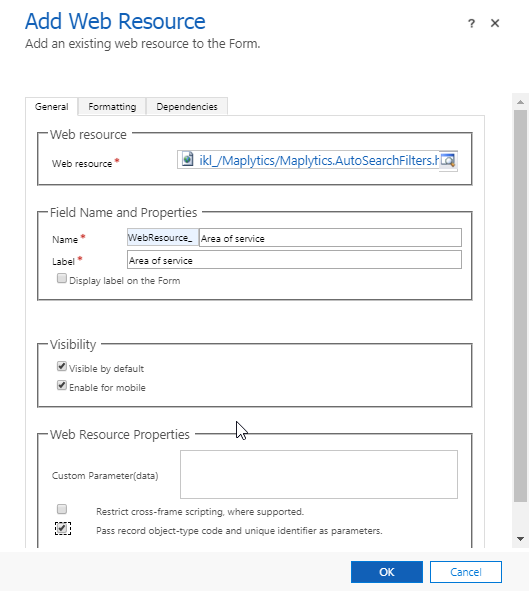
In Add Web Resource dialog box, select “ikl_/Maplytics/Maplytics.AutoSearchFilters.html” web resource and check ‘Pass record object-type’ checkbox.
The preferred number of rows in formatting is 15.
Click OK, then Save and publish form to see the Map on entity form.
Create an Area of Service field
To save the values entered in Area of Service field, user needs to create a field for the Entity for which Area of Service has been added. Go to Entity form > New field. Enter the following values:
Name – Area of Service
Data type – Multiple Line of Text
Maximum Length – 10000
Select the same field in respective Entity map for Area of Service field.
In this way, the corresponding data will be plotted on map when values are entered and saved into Area of Service field.
View Area of Service data on a map
There are two ways to view Area of Service data on map, they are:
- Using Map button – the results are shown in a map which opens in a different tab
- Adding Detail map on form – the results are shown in a map added to the same record
Using Map button
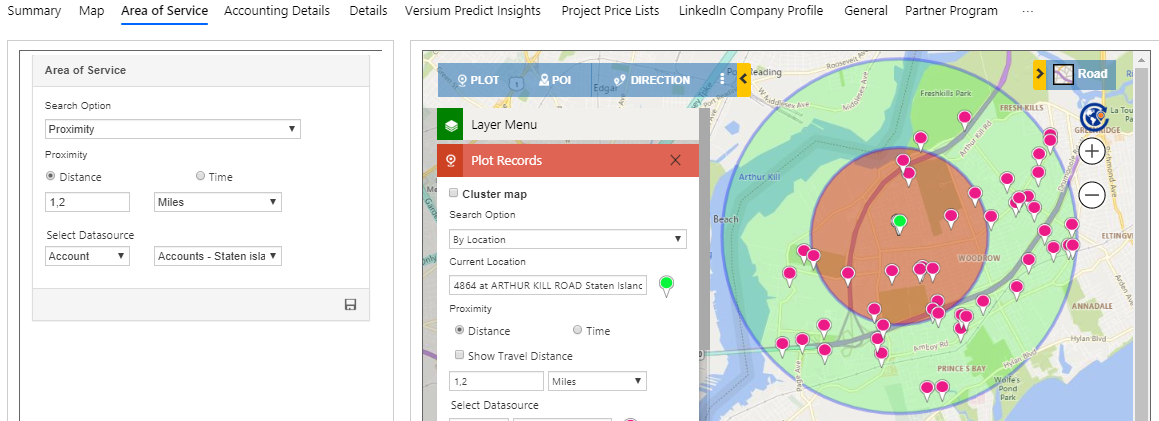
The user can open Detail map to view the corresponding Area of Service data plotted on map. This will open the result plotted from search criteria entered in Area of Service in a map opened using the button.
Adding Detail map on form
To add Detail map to show Area of Service data, follow the steps mentioned below:
Open Entity form and go to ‘Insert’ tab. Add two columns.
Click OK, then Save and publish the form to see Map on Entity form.
After adding Area of Service tab in entity form, follow the steps mentioned below to add Detail map on entity form.
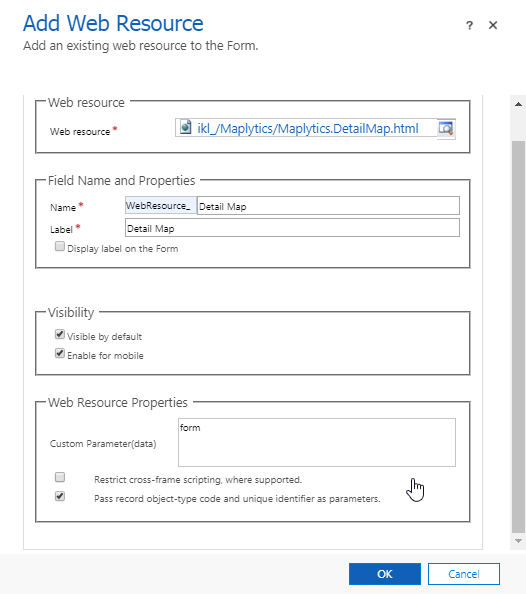
To add Detail map, click on ‘Web Resource’ button. In Add Web Resource dialog box, select “ikl_/Maplytics/Maplytics.DetailMap.html” web resource, add “form” as custom parameter (data) and check ‘Pass record object-type’ checkbox as shown in the screenshot. The preferred number of rows in formatting is 15.
Now enter the required values into Area of Service field, save it and click on refresh button on Detail map to view the plotted data. User can choose either of the search options – Region or Proximity, to visualize records within the proximity of respective Account or to visualise the regions entered.
This feature will help the users to get an understanding of data in regards to an individual record. Follow the above steps and start using this feature to add analytical insights to your Dynamics 365 CRM data analysis.
We always welcome your valuable feedback and suggestions.
Send us your views at crm@inogic.com


