Sales Territory is an important part to be planned efficiently when defining sales strategy for any business. Our aim has been to extend the existing Dynamics 365 CRM Territory feature native to the product and build upon it. Territory Management feature in Maplytics has helped users to significantly improve sales and customer satisfaction.
Maplytics radically simplifies the process of sales territory management in Dynamics CRM by allowing users to associate geographical boundaries to sales territories, efficiently perform territory realignment, and other important activities like reassigning sales territories.
With the latest release of Maplytics, we have tried to add another small but important feature in Territory Management to make its management a bit easier. Earlier users were able to edit the existing defined geographies on a map within Dynamics 365 CRM, making the process of territory realignment effortless!
Now users also have the option to upload multiple geographies through an Excel file supported by CRM using the Bulk Geographies feature in Maplytics.
Steps for adding geographies in bulk using Maplytics:
1. To upload the geographies in bulk, the user first needs to export an Excel template. For this, Go to Setting > Data Management > Imports > select ‘Excel Templates’ and then click on the ‘Create Excel Template’ option as shown in the below screenshot.
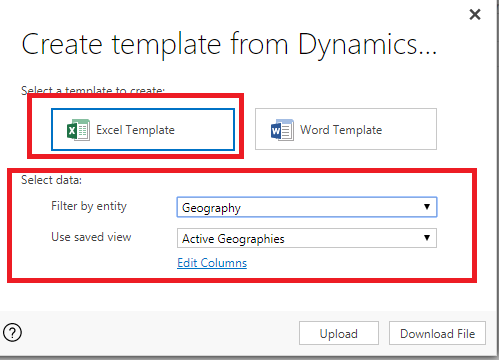
2. Then, Select the ‘Excel Template’ and in the ‘Select data’ section, select the ‘Geography’ Entity in the ‘Filter by entity’ field as shown in the below screenshot.


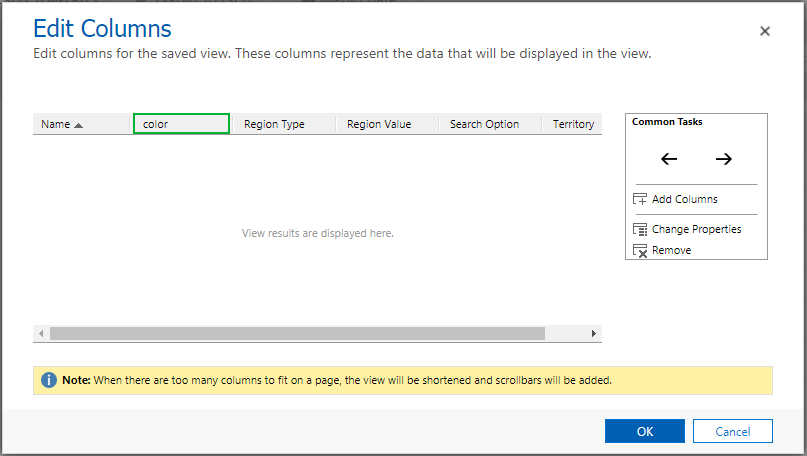
- Name: Name of the Geography.
- Color: Color should be in Hexadecimal i.e.( #DAF7A6). If the user enters the color in other format then the default color (Blue) will be set.
- Region Type: There are 6 region types that the user can define to create the geography. (Country, State, County, City, Postalcode1, Postalcode2).
- Region Value: If the user needs to create the geography based on Postal Code, then they can define the postal code values in this column. To define multiple geographies in a single territory, use the comma separator (,).
- Search Option: Bulk geography feature is available only for the ‘By Region’ option, so this value should always be ‘1’.
- Territory: This is a lookup value to define which geography belongs to which territory. The name of the territories in this column should match with the territories saved within your Dynamics CRM.
4. Once you are done with columns, download the excel template.
5. After downloading fill the data in respective columns and upload excel back into Dynamics CRM.
Voila, new geographies are created in Dynamics 365 CRM in no time and you are now all setup to organize your business markets!
Maply(tips) – Do I need to buy Maplytics licenses for all Dynamics 365 CRM users I have in my system. No you just need to buy Maplytics Licenses for the number of CRM users whom you want to give Maplytics access. Get started by downloading a free trial from our Website or Microsoft AppSource.
Happy Mapping!


